

DIY Glycol Plumbing


Alert reader Jonathan asked me if I could go over a glycol set-up, which I think I’ve done before but sure, why not?
This will be for smaller brewpub settings or tasting room breweries of ten or seven barrel equipment. If you are a production brewery, get it done professionally because of higher pressures and larger demands.
For you, piping you can use PEX or simple PVC from Home Depot. I’ve used both and personally I like PVC better because it’s cleaner and the lines are straighter, but either will do. For me, 3/4 inch piping works well. You can also buy pipe insulation to fit over the PVC.
I am using a simple glycol trunk-line chiller, 3/4 HP I get from Foxx Equipment. The prices have of course gone up but still compared to typical brewery glycol chillers they are cheap and can easily take care of three fermenters (Incidentally, my buddy Mic Heynekamp, when he opened his first brewery in 1995 used water coolers he bought used off eBay for $15. A work of staggering genius). Also they don’t push the glycol at a high pressure so you aren’t in danger with busting a jacket on your fermenter either.
Now let’s talk about the plumbing.
I prefer to set the piping up above the fermenter jackets, to help with any air bubbles, but in truth if you bleed the air out of the lines correctly, it doesn’t really matter.
What you are creating is a loop going from the glycol chiller around to the fermenters and then back again to the glycol chiller tank. The glycol chiller has a pump that runs 24/7, so the glycol is always in motion. To feed the loop from the glycol chiller I use braided hose from the pump to the PVC glycol loop.
The first thing in the loop is a pressure reducer. This is typically made of brass and is necessary to keep your line pressure under 15 psi. If you go above 15 psi you pop a weld on your fermenter (ask me how I know).
However if you aren’t using a large brewery glycol chiller and one of the draft line chillers they don’t have a much pressure so I don’t use a pressure reducer but rather a simple PVC cut off valve. You can use this to reduce the pressure or close off the system if you need to make any repairs.
After the reducer I add a pressure gauge so I can monitor the pressure, which as I said is not a big deal with the basic glycol chiller that I have used for years.
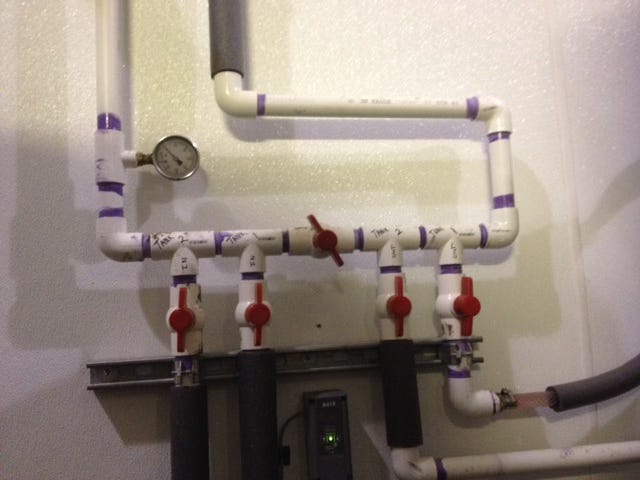
Next in line are a series of Tee’s with another cut-off valve at the bottom of the tee. Each fermenter gets its own Tee. The set-up in the picture is for two fermenters. Connected to the cut-off valve you can place your solenoid valve, which is connected to your temperature control device. You could also place the solenoid valve on the outlet of your fermenter jacket as well.


After these Tee’s you add another cut off valve. THIS IS SUPER IMPORTANT! I’ll explain later.
Next in line is another set of Tee’s, one for each fermenter. This will be the return.
After that you simply continue back to the glycol chiller. So here’s how it works-
The glycol is running in a continuous loop.
From the first Tee in line, run a braided hose to the bottom of the fermenter jacket.
At the middle cut-off valve, turn in slightly off, still allowing plenty of glycol through but creating a restriction in the loop. Watch your line pressure that it doesn’t go about 15 psi.
From the second top outlet of your fermenters jacket, run another brained hose back up to the second set of Tee’s AFTER the restriction valve. NOTE: it you have two jackets, as in a conical fermenter, the inlet of glycol goes into the bottom of the cone jacket. At the top of the cone jacket run a hose from that point to the bottom of the side jacket, acting as a jumper. Then, from the top outlet of the side jacket, run a braided hose to the second set of tee’s so the glycol goes back into the loop after the restriction valve.
To bleed the air out of the system turn the controller that connects to the solenoid valve to on, calling for glycol. Then go the middle restriction valve and slowly turn it completely off. This will force all the glycol through the jackets and hopefully force out all the air. Do this one at a time with each fermenter, turning one on while the others are turned off. REMEMBER AFTER YOU HAVE DONE THIS TO OPEN BACK UP THE RESTRICTION VALVE PART WAY SO GLYCOL IS ONCE AGAIN FLOWING THROUGH THE LOOP.
Insulate everything as best you can. You should be all set to go. This process from start to finish takes me less than two hours. It also saves buckets of money. Good luck and let me know if you have questions.


